Departments – Info tab
Use the Departments Info page to set up a department and create additional departments.
Note: The Main department should have been automatically set up from the
Review and edit the following fields as necessary:
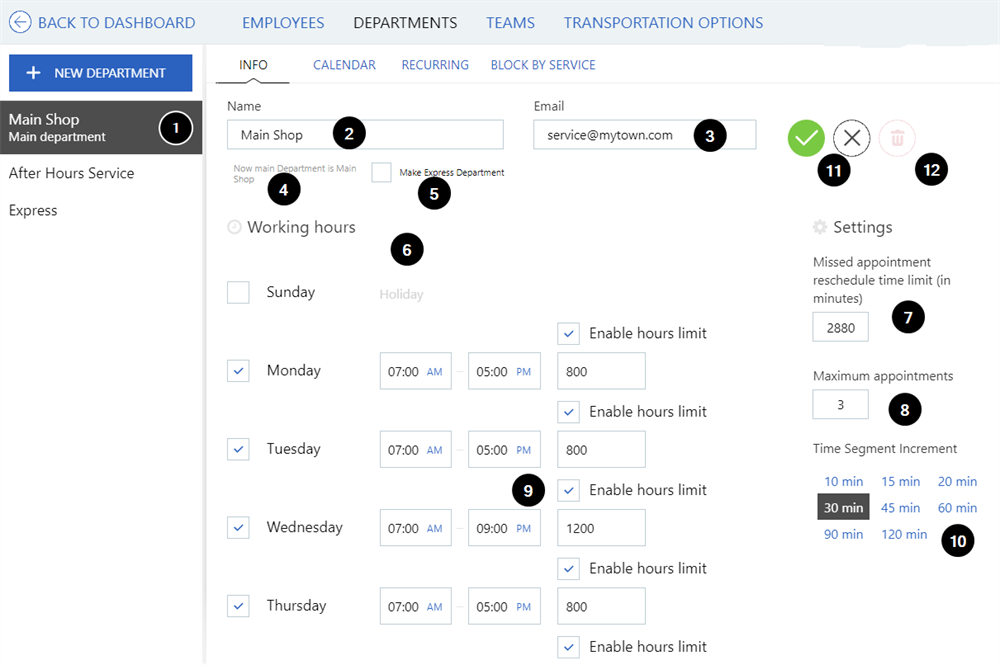
- Click on the department name in the department list on the left. The department information appears on the right.
- The Name field shows the department name.
- The E-mail field shows the department email which is used for confirmation messages from Appointment Manager.
- To set this department to be the Main department, select the Make Main Department checkbox (if not already selected).
- To set this department to be an express service department, select Make Express Department.
- Ensure that the appropriate services are configured for the department as described in Departments – OP-Code tab.
- Additional departments can be flagged as 'express' but note that all services in the
- The department name does not have to include the word ‘express’.
- The Main Department can be selected.
- Ensure that the appropriate services are configured for the department as described in Departments – OP-Code tab.
- The Working hours section shows the actual hours that the department is open.
Edit the working hours as follows: - Select the check box beside the day to be edited. Leave a day unchecked if there are no working hours and it is to be considered a holiday.
- Adjust the times. Select “AM” or “PM” after you set the start and end times.
Note: If the
- The Missed appointment reschedule time limit (in minutes) is used to restrict missed appointment rescheduling in the Appointment Manager. This value is the maximum elapsed time allowed (from the original appointment time) to reschedule the appointment. The default is 2880 minutes (48 hours).
- If this time has passed, the missed appointment cannot be rescheduled. Instead a new appointment would need to be created.
- If the time has not passed, the appointment can be edited and a new time selected in the Appointment Manager.
- The Maximum appointments field shows the number of appointments the
- For example, if a
- In Appointment Manager, a time is labeled ‘Full’ in the Day or Week view if the maximum number of appointments has been reached.
- The value in this field cannot be greater than the number of
- For each day of the week, the Enable Hours limit check box indicates if there is a limit to the number of hours that can be booked through Appointment Manager and
- If it is not checked, then there is no limit to the number of appointments that can be booked that day. If it is checked, the maximum number of hours is maintained in the field below it.
- In Appointment Manager, if the
This is a warning to the - If the total department hours for the day have been exceeded, no more appointments can be booked for the day.
- Use Time Segment Increment to review and set the number of minutes between appointments (i.e. the minutes per time slot for checking in the
- For example, if this value is set to 15 minutes, the time slots in Appointment Manager would show as 7:00, 7:15, 7:30, 7:45 etc. If set at 20 minutes, the time slots would show as 7:00, 7:20, 7:40 etc.
- If the
Note: Ensure that the time segment increment is the same as in your DMS.
- Click “Save”
 to save any updates on the page. The updates are effective immediately. Click “Cancel”
  to cancel any updates and reset the values. These buttons only appear once a change has been made on the page. A confirmation notice is displayed when a change is successfully saved.
 - Click “Delete”
 to permanently delete the department. You will be asked to confirm the deletion.
To create a new department, start by clicking "New department". The first step, ‘Info’, is displayed as follows:
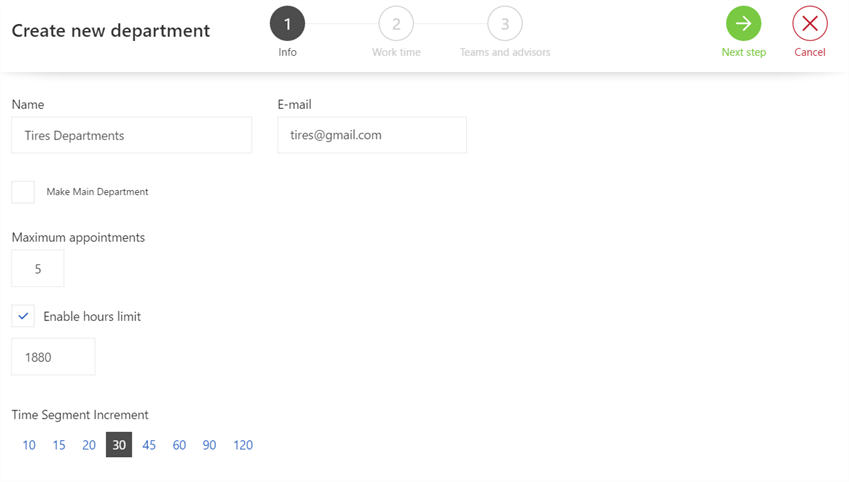
On step 1, the Info page:
- Complete the department information, as described in the previous section: Name, E-mail, Maximum appointments, hours limit and Time Segment Increment.
- Click
 to continue to step 2 ‘Work time', as shown below, or click
  to cancel your changes and return to the Info Tab.
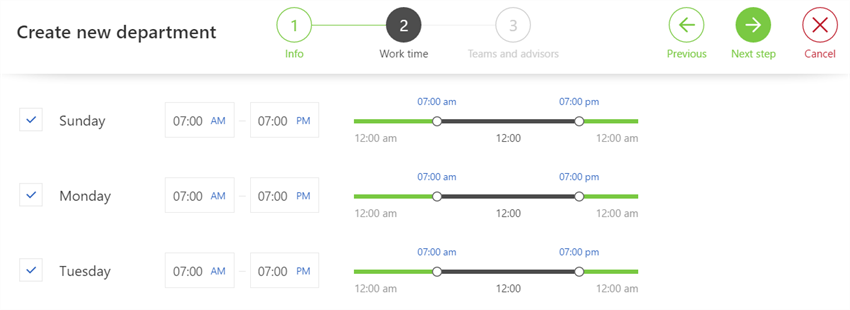
On step 2, the Worktime page:
- Set the department working hours as described in the previous section, using the time fields, or set the hours using the time lines: grab the circles on the time line for a day and slide them to the desired start and end points to indicate the day’s working hours.
- Click to continue to step 3, ‘Teams and advisors’ as shown below, or click to cancel your changes and return to the Info Tab. Click
 to return to step 1.
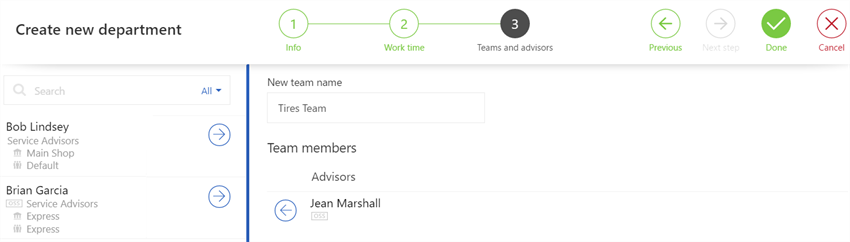
On step 3, the Teamsand advisors page:
- Enter a New team name. Each department must have at least one team. For more information on setting up teams, refer to Teams tab.
- Click
 to select employees from the list on the left and add to the team.
 - Click
 to complete the new department and return to the Info tab, or click to cancel your changes and return to the Info tab. Click to return to step 2.
When the department setup has been completed, a confirmation notice is displayed and the new department name appears in the department list on the Departments – Info tab.
Each service department can be configured to default to a specific DMS department.
Note: The list of DMS departments is defined in
This functionality specifically helps
- Operate Express and Main shop departments as separate entities with respect to shop capacity and accounting.
- Are multi-brand and need to have distinct shop capacity and accounting operations, for example to handle OEM warranty claims.
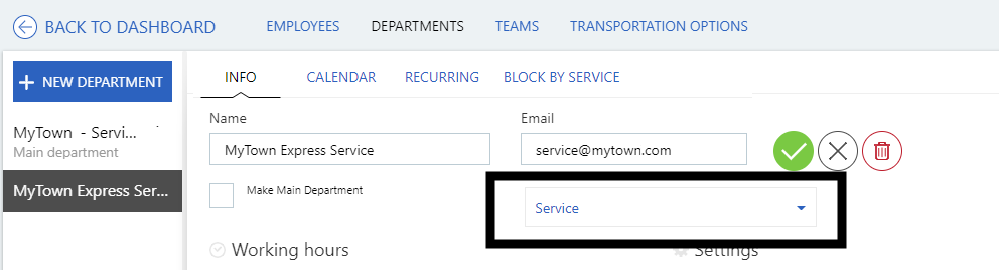
To set the default DMS department for each service department, select a department name from the drop-down list. The default configured in the
The DMS department can be changed from this default on the Time & Advisor page or Summary page when creating or editing an appointment.
If this configuration is not completed, the default DMS department is used for all appointments.
Note: When creating new departments, remember to check the DMS department setting. The default DMS department will always be pre-selected. Update it as needed.